The eCitizen portal is where Kenyan citizens and residents can conveniently apply for and access a wide range of government services, including passport applications, national ID card services, driving license renewals, business registration, certificates of good conduct, and more. eCitizen offers a user-friendly interface, allowing individuals to create an account, submit applications, make payments securely, and track the progress of their requests.
Although the passport registration process is straightforward, you might wonder why your passport is not yet ready for collection. In this article, we will break down the passport processing stages in Kenya from the time of registration to when it is ready for collection and all the back-office operations involved. You will learn how to apply for a passport in Kenya, and all of the processes involved before your passport will be made available and ready for collection.
Stages of Passport Processing in Kenya
Stage 1: Create an eCitizen Account
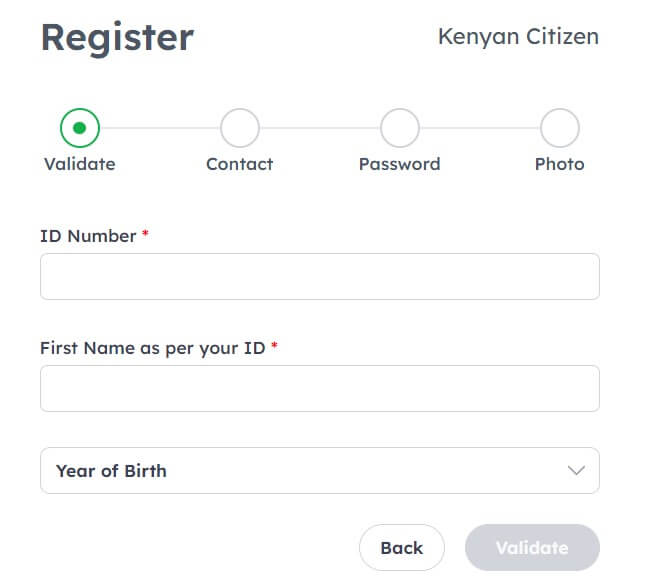
To begin your passport processing, you must create an eCitizen account. The eCitizen platform is the only government platform where you can register and have your passport processed. To begin, visit the “eCitizen platform”, navigate the menu, and click the “register” button. You must register with your National ID number, Full Name, Date of birth, phone number, email, and other personal information.
Once you finished registering for the eCitizen account, a link will be sent to your registered email address to verify your account.
Stage 2: Log in to your eCitizen Account
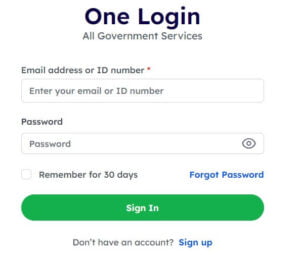
After creating and verifying your eCitizen Account, you will have to log in to your account for the first time. To log into your account, you will have to visit the portal login page and enter your email address or ID number and password.
For those who already own an eCitizen account, you won’t be able to register for another account. If your account was created by someone else and you don’t know the password, you should make sure you have the email used to register the account. If you are unable to log in, you can click on “Forgot Password“, a link to create a new password will be sent to your email address.
Stage 3: Navigate to ‘Department of Immigration Services’
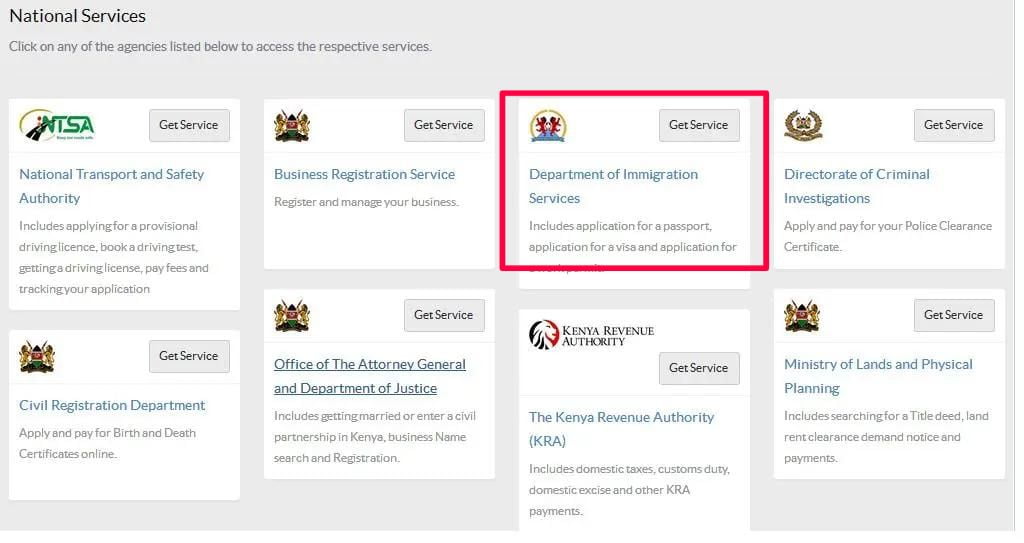
Once you are logged into your account, you will be taken to the dashboard. On the dashboard, you will see a list of government services, Find the “Department of Immigration Services,” and then click on “Get Service.” You will see all of the services offered by the immigration department, click “Get Service” under the “Passport Application” section.
Stage 4: Select the Type of Passport you want
You will be prompted to select the type of account you are creating on the next page. You are either creating the account for a child or an adult. But there are five types of accounts, they are;
- Ordinary (32 Pages Ordinary “A” Series, 48 pages Ordinary “B” Series, and 64 Pages Ordinary “C” Series).
- East African Passport
- Diplomatic passport (48 page)
- Mutilated Passport
- Lost Passport (For those renewing their lost passport)
You should note that the different passport comes with different prices. The East African Passport costs the lowest with a cost of Ksh. 990 while passport renewing is Ksh. 12,050.
Stage 5: Which Passport Application?
After choosing the type of passport you are creating, the next page will ask you to select if you are a new applicant or if you are renewing your passport. If you are just requesting a passport for the first time, choose “new application”, if you want to renew your passport, choose “renewal”.
The page will show you the application guidelines and the cost of your selected application type at the bottom. When done, click on submit to continue.
Stage 6: Fill Application Form and Upload Documents
On the next page, you will be requested to enter all of your details and upload some backing documents to affirm your claim. All of the details and documents you will be requested are;
- Full Name.
- ID number.
- Phone number.
- Both Parents ID
- If you have a passport, an old passport number.
- If the parent is deceased, the death certificate number.
- Date of birth.
- Eye color.
- Height.
- Original birth certificate.
- Original National ID Card.
- Current passport-size photos.
- Recommender’s ID Card copy.
- Consent letter for minors.
- Old passport for replacement (if available).
- Parents’ National ID card.
Stage 7: Make Payment
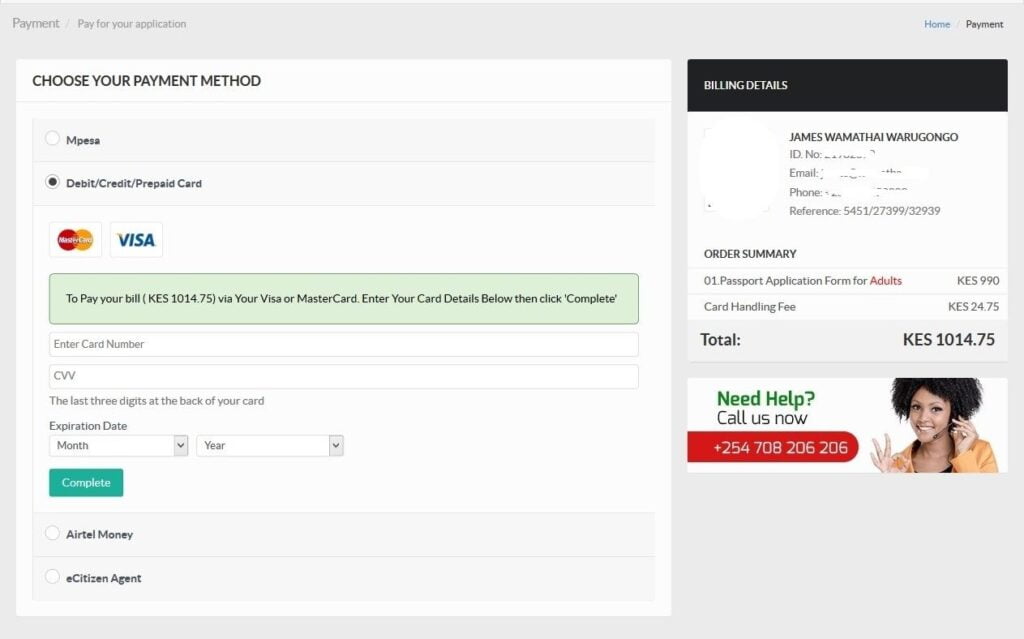
After submitting all necessary documents, you will be requested to make payment on the next page. The different payment methods available are credit/debit card, Airtel Money, M-Pesa, and eCitizen Agent. You should know that there is a Card Handling fee to be paid with the normal charges. If the payment is successful, you can move to the next stage
Stage 8: Book An Appointment For Biometrics
The next stage will prompt you to book an appointment for biometrics. You should know that If you do not do your biometrics capturing, your passport will not be processed. You should pick a location closest to your home/office address for the biometrics. When you select a location, the system will automatically schedule a time for the biometrics, and you can decide to change the period. After selecting your appointment, print out the application schedule and your payment invoice.
Stage 9: Attend Biometric Appointment
After booking and printing your schedule, your online application is completed. You should wait till the day of your appointment and then visit the location you selected at the given time., Go along with your payment invoice and your schedule print-put to the location. At the location, a photo of you and your fingerprints will be captured. It takes less than 10 minutes to complete your biometrics.
Stage 10: Wait For Notification
After you have finished your biometrics, you will have to wait for your passport to be ready. You will be notified through email and SMS when your passport is ready for pickup. In most cases, your passport will be available for pickup in the location where you captured your biometrics. The passport processing takes between 1-3 weeks before it’s ready.
Final Thoughts
Getting your Kenyan Passport is simple, all you have to do is register an account on the eCitizen app, go to the directorate of immigration page, register for the passport, and book an appointment for Biometrics capturing. After completing registration, print out your payment invoice and appointment scheduled, and take the printout to your biometric location. Then wait for a few weeks to get an SMS notifying you that your passport is ready for collection.


